Ok, so my first post wasn't from the Basics chapter, but I have an excuse. I've been baking bread for a while, using recipes from The Fresh Loaf. Admittedly it was a different recipe and I've only ever done pan loaves, but I felt comfortable diving into the the bread recipes. Also, we needed bread.
As I learned from The Fresh Loaf, real French bread has just four ingredients, flour,water, yeast and salt. This recipe has exactly that, though in larger quantities then I was used to. I wasn't sure my mixer could take it, but then I noticed that Jacques uses the same mixer and my worries were lessened.
This recipe starts with proofing the yeast and mixing the water with 2/3 of the flour in the mixer, then adding some more flour, and then turning it out on to the counter to work in the the final amount of flour. After the usual kneading and rising, you have bread dough (if you want the exact details buy the book!). Thus ends technique 206.
My bread took quite a while to double in size. I think I killed some of my yeasties my overly hot water. I felt really bad about killing the yeasties because they make two of my most favorite things possible, beer and bread. I said a quick prayer for my yeast friends and moved on.
In the next technique, 207, Jacques shapes his dough into baguettes. I lack the proper couche and sticks to shape baguettes properly, plus I find baguettes useless for my family, so I shaped my bread into boules.
Now boules are supposed to be the easiest of bread shapes to do, so I felt they were in my grasp. I watched a few videos online (thanks Fresh Loaf!), and shaped my loafs into what I felt were appropriate boule shapes and left them to proof. When they (finally!) got to where I needed them to be I put them in the oven to bake.
Now this is where things go completely sideways. My earlier forays in to bread making taught me that professional bakers use steam-injecting ovens to get that really crisp crust, and the best way for a home baker to get that crust is to put hot water in to a hot bread pan when the bread is first put into the oven. This enters into my story because my oven was set up like this: bottom rack, bread pan, middle rack, stone pie pan, bread.
After setting things to baking and relaxing with my favorite yeast-based beverage, I started to smell something burning. I went to investigate and found that my bread had risen into the upper element of the stove. After a bit of swearing, I got the bread yanked out of the element, the oven rearranged and things baking again
The upshot is that one of my loaves came out with a "face" as is shown below.
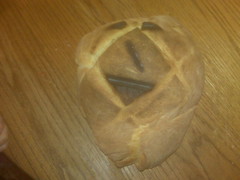
Also you can see that the bread also managed to push out the back, rather than through the slashes I made in the top. I think I didn't seal my seams very well.
I did get one decent looking loaf out of it. Look at that one little hole!

Overall, the bread tasted really good and made great toast and sandwiches! I will have to keep working on this technique, the fam really liked the bread and with today's bread prices it makes economic sense. I will have to work on a whole wheat version, because that's what the Webb family is into.
Well that's it folks!
TTFN
Geoff

As I learned from The Fresh Loaf, real French bread has just four ingredients, flour,water, yeast and salt. This recipe has exactly that, though in larger quantities then I was used to. I wasn't sure my mixer could take it, but then I noticed that Jacques uses the same mixer and my worries were lessened.
This recipe starts with proofing the yeast and mixing the water with 2/3 of the flour in the mixer, then adding some more flour, and then turning it out on to the counter to work in the the final amount of flour. After the usual kneading and rising, you have bread dough (if you want the exact details buy the book!). Thus ends technique 206.
My bread took quite a while to double in size. I think I killed some of my yeasties my overly hot water. I felt really bad about killing the yeasties because they make two of my most favorite things possible, beer and bread. I said a quick prayer for my yeast friends and moved on.
In the next technique, 207, Jacques shapes his dough into baguettes. I lack the proper couche and sticks to shape baguettes properly, plus I find baguettes useless for my family, so I shaped my bread into boules.
Now boules are supposed to be the easiest of bread shapes to do, so I felt they were in my grasp. I watched a few videos online (thanks Fresh Loaf!), and shaped my loafs into what I felt were appropriate boule shapes and left them to proof. When they (finally!) got to where I needed them to be I put them in the oven to bake.
Now this is where things go completely sideways. My earlier forays in to bread making taught me that professional bakers use steam-injecting ovens to get that really crisp crust, and the best way for a home baker to get that crust is to put hot water in to a hot bread pan when the bread is first put into the oven. This enters into my story because my oven was set up like this: bottom rack, bread pan, middle rack, stone pie pan, bread.
After setting things to baking and relaxing with my favorite yeast-based beverage, I started to smell something burning. I went to investigate and found that my bread had risen into the upper element of the stove. After a bit of swearing, I got the bread yanked out of the element, the oven rearranged and things baking again
The upshot is that one of my loaves came out with a "face" as is shown below.
Also you can see that the bread also managed to push out the back, rather than through the slashes I made in the top. I think I didn't seal my seams very well.
I did get one decent looking loaf out of it. Look at that one little hole!
Overall, the bread tasted really good and made great toast and sandwiches! I will have to keep working on this technique, the fam really liked the bread and with today's bread prices it makes economic sense. I will have to work on a whole wheat version, because that's what the Webb family is into.
Well that's it folks!
TTFN
Geoff
1 comment:
This was one of the best stories I have come across. I am definitely keeping up with you and your blogs. Good work and I am sure the bread was delicious! -Lael
Post a Comment